Banners
File Upload
You can send us multiple files at a time, in a variety of formats. Including: .pdf, .eps, .ai, .jpg, .psd. To expedite your order you will be asked for your account rep, if you do not know your account rep simply choose general and we’ll make sure it gets to the appropriate person.
PDF Settings
To minimize potential issues like missing fonts and color space incompatibility we recommend sending us PDF/x-1a files whenever possible.
What Is PDF/X-1a?
PDF/X-1a is a subset of Adobe’s Portable Document Format (PDF). PDF/X1a stands for PDF eXchange 1a. The “1” means that it is a blind exchange document – all fonts and images are embedded and “a” is the variant of PDF/X1 that was ISO accredited ISO standard ISO15930-1 :2001
PDF/X1a meets the following specifications
- All fonts and images are embedded.
- All elements are encoded as CMYK, spot or Device N.
- They may not be encoded as three-art color spaces such as RGB or CIELab.
- The MediaBox and TrimBox or ArtBox are defined.
- Trap must be indicated as on or off, alerting the printer to the condition of the document. The printing condition characterized (such as SWOP) through the use of an Output intents operator.
- PDF/X1a resolves many issues associated with basic PDF as a format for file exchange.
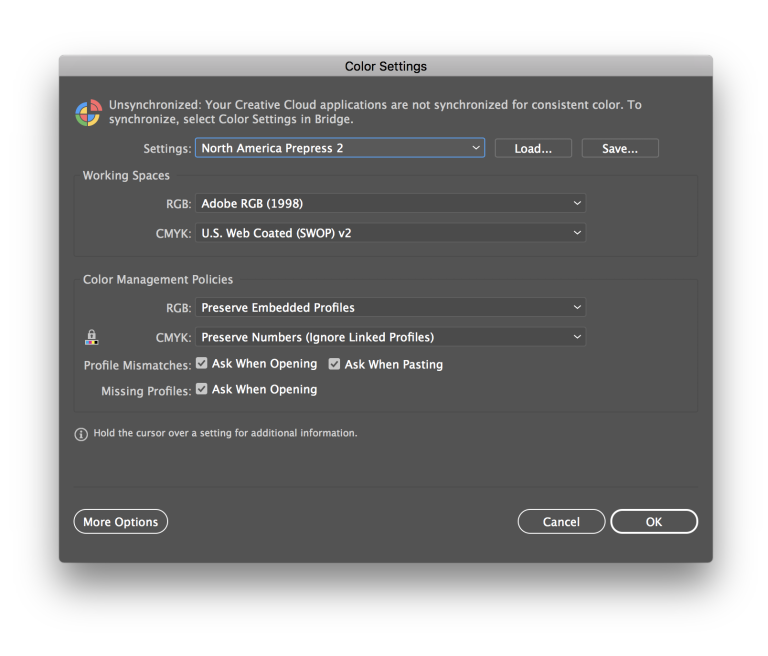
Color Settings
The best method for sending your project is to send it using a CMYK color workflow. Every image in a document has 2 profiles, one that communicates with your display and the other that communicates with your printer; it is how color is determined. RGB communicates with your monitor and CMYK communicates with printers.
If your monitor hasn’t been calibrated with a monitor calibrator, odds are you don’t see the same thing as everyone else. With the price down to under $100, it is a vital tool to have and learn to use. The most common problem with a non-calibrated monitor is the user is viewing a purple as a blue.
(If I had a dollar each time that happened!).
The image below indicates the standard color settings for our workflow; it is the most common flow for the large format industry. By changing your settings to match our workflow, you will be rewarded with a predictable color.
Files for Large Format
This is just a very brief overview of file preparation, if your situation is unique and this guide does not address your concerns; please call your customer service representative for assistance.
File preparation for large format is similar in many ways to file preparation for offset printing. Some of the more noticeable differences will be the size of the photos used and possibly the need to scale your image down due to software page size limits.
There are typically 3 types of files used in large format printing, vector paths and outlines, bitmap, or a combination of both.
Vector
This is the simplest and most efficient method. Programs such as CorelDraw and Adobe Illustrator are vector based programs. These files should be saved in there native format i.e. CorelDraw would be a .cdr, and Illustrator would be an .ai file. Be sure all colors are either Pantone or CMYK, and that all fonts have been converted to curves or outlines.
Bitmap
Programs like Photoshop and PhotoPaint create photographic images that should be flattened and saved as a CMYK jpg. When saving your file as a jpg, you will be prompted to give parameters to your image. For Image Option, use quality setting number 8. Higher settings won’t deliver a sharper image, but lower settings will degrade the quality. Be sure your Format Options reflect a “standard” baseline setting.
Vector/Bitmap
Quark and In Design are great for making these types of files. The most successful way to send this type of file is to export them as a PDF that is X1a compliant. For more about PDF X1a files, click the link above. Again, ensure all colors are either Pantone or CMYK and all fonts have been converted to curves or outlines.
Scaling
Full size is best, but not always an option. Here is the order for scaling, the higher up the list, the better.
- 1 to 1 (life size) – print resolution
- ¼ = 1 (quarter scale) – print resolution x 400
- 1/10 = 1 (tenth scale) – print resolution x 1000
- 1/20 = 1 (twentieth scale) – print resolution x 2000
The bottom line is, we want you to be completely satisfied with your print. By using the above guide, you can ensure that your file will be printed quickly and correctly.